This is the fourth in a series of blog posts on Google Tag Manager. Read Part 1. What is a Container Tag?, Part 2. Google Tag Manager Series: 2. An Overview and Google Tag Manager Series: 3. How to organise a Google Tag Manager Implementation. At iProspect, we have been using multiple vendors for container tags since 2010. This series focuses specifically on Google’s new Tag Manager, providing an overview of the tool, helpful tips, hints, and learnings.
Setting up Google Analytics in Google Tag Manager is a fairly simple process. Using Google Tag Manager’s integration modules, or ‘Tag Types’, all types of Google Analytics tracking may be set up, like the page view code, events, custom variables, and social interactions.
When transferring tags from being hard coded on the site to being held within Google Tag Manager, it can be a little trickier to setup some features that are not available, ‘out-of-the-box’. This blog post will go through three advanced features – the first is how to create a roll-up report, the second is how to set up cross-domain tracking, the third is how to automatically track downloads. The post has been written as a step-by-step guide for each one.
All information was accurate at the time of writing, however, may be likely to change with updates to Google Tag Manager. The blog post aims to use pre-setup ‘Tag Types’ instead of ‘custom html’ JavaScript – though this is also a perfectly acceptable method of setting up code.
Site level and Roll-Up Reports
Roll up reporting is not currently a standard feature in Google Analytics. However, many businesses or analysts want a separate account or property for individual websites, and one account or property that acts as a roll-up with all websites together.
When placing Google Analytics directly on the site, this was done through combining the two accounts or properties together into one code. The second account was then ‘named’. This would look like this.
5: var _gaq = _gaq || [];
6: _gaq.push(
7: [‘_setAccount’, ‘UA-123456-1’],
8: [‘_trackPageview’],
9: [‘rollupReport._setAccount’, ‘UA-123456-2’],
10: [‘rollupReport._trackPageview’]
11: );
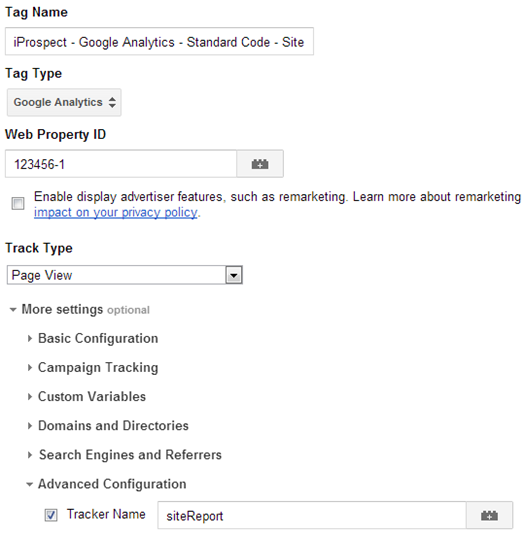
In Google Tag Manager the pre-setup Google Analytics ‘Tag Type’ can be used. One will be needed for site and one for roll up reporting. Create a ‘Page View’ Google Analytics tag, choose the ‘Advanced Configuration’ drop down, and name your tracker with a useful and unique name. For example the site report Google Analytics tag may be called ‘siteReport’ and the tag may be called ‘rollupReport’.

An example of naming the tracker in Google Tag Manager.
Please note: Google does discourage naming trackers as it does mean that there must only be one tracker on any site with that name, and that all Google Analytics codes must then be named.
If you do want to set up roll-up reporting then please ensure that all standard Google Analytics code is completely removed from the site itself. Please ensure that if using Classic and Universal simultaneously and using name trackers, they have different names, like ‘uaSiteReport’, and ‘gaSiteReport’.
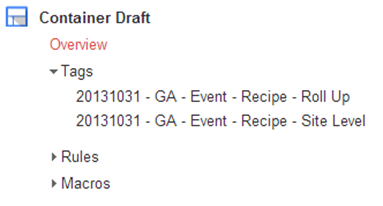
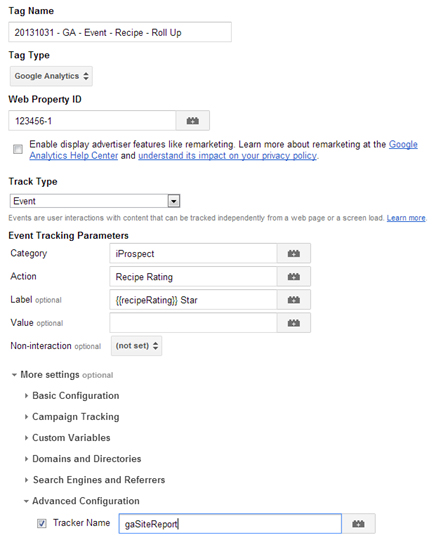
It is important to note that all Google Analytics code (like events, custom variables, and social interactions) must be setup to fire to both the site report and the roll up report by naming the code in the same way – when setting up events if you would like to use the integrated module, select the appropriate ‘Tag Type’, and in the advanced configuration name the tracker the site level name. Then repeat this for the rollup name. In essence, if the ‘Tag Type’ integration modules are always used, there should be two of each code (for example, two ‘recipe events’)

An example of a site and roll up tag.

An example of naming one ‘Tag Type’ Event.
If you are setting up using Universal Analytics, the same method can be applied to setup a roll up report – just go to the ‘Advanced Configuration’ option in the Universal tag and select ‘Tracker Name’.
Tracking File Downloads Automatically
Traditionally PDF and other file downloads were tracked through a Google Analytics event or virtual pageview placed on the relevant link. The code would generally look like this:
<a href=”/iprospect.pdf” onClick=”_gaq.push([‘_trackEvent’, ‘iProspect’, ‘Download: PDF’, ‘iprospect’]);”>Download PDF</a>
Some individuals would use JQuery to automatically apply events to links. This was quite complicated and could go wrong if other non-standard implementations (like roll up reporting) were also being used.
A recent update to Google Tag Manager has made tracking PDF downloads (and other onClick elements) a lot easier to track – auto event listeners!
This blog post will talk through how to use an event listener to automatically track your file downloads in Google Analytics. For more information on event listeners, please read Google’s Blog post.
The concept:
- An ‘event-listener’ tag is setup, this is a pre-built Google Tag Manager special tag that listens for a link, like a button click or hyperlink and if clicked attaches a code called ‘gtm.linkClick’ to the link
- This gtm.linkClick can then be used in a rule of any tag to fire other codes, on the link, like a Google Analytic event.
The instructions below run through the macros, rules, and tags needed for auto-download tracking. It presumes the standard Google Analytics or Universal Analytics Pageview tag is already present. Setup each of the following, publish the tag and then click a link and check in Google Analytics real time reports that an event is firing.
Macros to setup:
Macro Name: documentType
Macro Type: Custom JavaScript
function() {
var documentType = {{element}}.href.split(‘?’).shift().split(‘.’).pop();
return documentType;
}
What this does: Like linkHref it returns the file format – this is used for the action.
Macro Name: element
Macro Type: Auto-Event Variable
Variable Type: Element
What this is: This is the element on which the click occurred
Macro Name: linkHref
Macro Type: Custom JavaScript
Custom JavaScript:
function() {
var documentHref = {{element}}.href.split(‘?’).shift().split(‘/’).pop();
return documentHref;
}
What this does: Removes query strings, searches for the last slash, keeps everything after it. Returns a clean document filename and extension. This is used for the label and the firing rule.
Rules:
Rule Name: All Pages
Conditions: {{URL}} | Matches RegEx | .*
What this does: Fires on all pages
Rule Name: On Download Link Click
Conditions: {{event}} | contains | gtm.linkClick
Conditions: {{linkHref}} | matches RegEx (ignore case) | \.doc|\.docx|\.pdf|\.ppt|\.pptx|\.txt|\.xls|\.xlsx|\.rtf|\.csv|\.rar|\.zip|\.swf|\.mp3|
\.mpg|\.avi|\.mp4|\.vsd|\.vsdx|\.wav|\.wmv
What this does: This rule checks to see whether a link click matches a list of commonly downloaded file extensions.
Tags:
Tag Name: GA Link Click Listener
Tag Type: Link Click Listener
Firing Rules: All Pages (see above)
What this does: This code ‘listens’ for when there is a link and if clicked, fires the JavaSCript event ‘gtm.linkClick’ which is used by any tag that is dependent on an element click.
Tag Name: Google Analytics – Event – File Download
Setting up this depends on if you are using classic Google Analytics or Universal Analytics or both. Repeat this step for classic and universal, if required, and for site and roll up reports if required.
For Google Analytics Classic:
Tag Type: Google Analytics
Web Property ID: The Site’s ID (UA) code
Track Type: Event
Event Tracking Parameters:
Category: Anything
Action: {{documentType}} download
Label: {{linkHref}}
Advanced: Name the tracker if relevant
What this does: This will fire an event into Google Analytics classic with your action sent as the type of document download and your label as the URL path of your PDF that was downloaded.
For Google Analytics Universal:
Tag Type: Universal Analytics
Web Property ID: The Site’s ID (UA) code
Track Type: Event
Event Tracking Parameters:
Category: Anything
Action: {{documentType}} download
Label: {{linkHref}}
Advanced: Name the tracker if relevant
What this does: This will fire an event into Google Analytics Universal with your action sent as the type of document download and your label as the URL path of your PDF that was downloaded.
The codes above ‘listen’ for when a link is clicked, attaches a code to that link which is then used as a rule to fire a Google analytics event with information around the download.
Cross Domain Tracking
Google Tag Manager has a few options for setting up cross-domain tracking on a website. This can either be completed through the integration modules or through custom script.
Cross-domain tracking ensures that as visitors move from one domain to another, they are logged in Google Analytics as one visit/session. Without cross-domain tracking, when a visitor moves from one domain to another, they would become a new visit.
This blog post outlines how to setup cross-domain tracking in Google Analytics classic, using the integration modules provided by Google. At the time of writing, each domain will need to have a separate tag and rule setup in order for cross-domain tracking to work in every eventuality.
Macros to be setup:
Macro Name: element
Macro Type: Auto-Event Variable
Variable Type: Element URL
What this is: This is the target URL for which the click occurred.
Macro Name: isExternalLink
Macro Type: Custom JavaScript
function(){
return {{linkHref}}.indexOf({{urlHostname}})<0 ? true : false;
}
What this does: This macro returns true if a clicked link targets an external domain, else it returns false.
Macro Name: linkHref
Macro Type: Custom JavaScript
Custom JavaScript:
function() {
var documentHref = {{element}}.href.split(‘?’).shift().split(‘/’).pop();
return documentHref;
}
What this does: Removes query strings, searches for the last slash, keeps everything after it. Returns a clean document filename and extension. This is used for the label and the firing rule.
Macro Name: urlHostname
Macro Type: URL
Component Type: Hostname
Other: Tick stripe ‘www.’
What this is: This is the hostname (domain) without www.
Rules to be setup:
Rule Name: External Link Click
Conditions: {{isExternalLink}} | equals | true
Conditions: {{event}} | contains | gtm.linkClick
What this does: Sets the cross domain to only fire when visitor clicks a link to a different domain.
Tags to be setup:
Tag Type: Google Analytics
Web Property ID: The Site’s ID (UA) code
Track Type: Page View
Advanced:
‘Allow Anchor’ ticked
‘Allow Linker’ ticked
What this does: This is your normal standard Google Analytics that is probably already on the site. Please ensure the both advanced options are selected.
Tag Type: Google Analytics – Cross Domain Tracking
Web Property ID: The Site’s ID (UA) code
Track Type: Cross-domain Tracking for Link
Target URL: {{element}}
Advanced:
‘Allow Anchor’ ticked
‘Allow Linked’ ticked
Rules: External Link Click
What this does: This is the cross-domain code. Please ensure the both advanced options are selected. It is important at the time of writing that this is setup for each domain needed.
Tag Type: Link Click Listener
Firing Rules: All Pages (see above)
What this does: This code ‘listens’ for when there is a link and if clicked, fires the JavaScript event ‘gtm.linkClick’ which is used by any tag that is dependent on an element click.
This code will ‘listen’ for a link and if external, attach the information needed for Google to keep the session live from one domain to the other. The easiest way to assess if this is working correctly is to check that when moving from one domain to another, at the end of the URL there should be the text ‘#__utma=’ followed by a strong of information.
Summary:
Google Tag Manager is constantly being updated, hopefully this blog post will have explained how to use some of the newest features to transfer your setup from being hard coded on the site to being in Google Tag Manager.


